The Process:
This quarter has been taking its toll on my creativity and my ability to find inspiration. With all the homework I have from all my classes, I'm having trouble finding time to find a hairstyle to recreate, let alone practice it. On the day of, I was trying things with my hair for half an hour before deciding to just curl it and get on with the Messy Heart Bun. In all honesty, I thought I came up with this hairstyle a few weeks ago as a backup (thank goodness because it certainly came in handy) but upon my perusal Valentines Day and heart shaped hairstyles on Pinterest, I came across this Pin from a few years ago that I have definitely seen before. It's been nestled in my subconscious for who knows how long and has now emerged, giving me the impression that I came up with it on my own. There's no denying that the source of the hairstyle came from the Pin, but I put my own spin on it, partially because that's how I envisioned it and partially because my arms would be too tired if I did it at the back of my head. I know the extent of my arm stamina.The Tutorial:
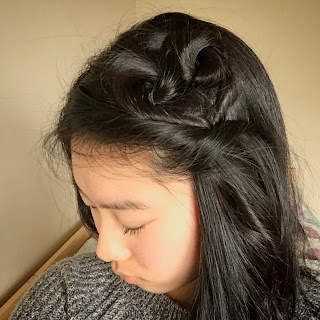
If you want to take a look at the original post, here's the link to the Beauty Department's Heart Bun. And now to describe the tutorial in my own words: (1) If you choose to do so, curl your hair. Any texture will work, but curls are extra romantic for Valentine's Day. (2) Part your hair to one side and section off two pieces of hair, the first about an inch back and the next section right behind it. The sections can be as thick as you'd like but keep in mind that although you'll get a fuller heart with more hair, you'll also have a harder time pinning it and keeping it looking nice. I chose to take sections that were about half an inch wide and approximately an inch thick. (3) Tie off each section fairly close to your scalp, but not touching. If it's too close to your scalp the elastic won't have any give to make the tops of the hearts. Also be sure to not tie it too low on your head because if you're like me, you have ears. (4) Take one of the sections (I found it easier to start with the back section) and twist away from the center of the heart. (6) When it's tight, put a finger on the elastic and bring the twist around to make the top of your heart. Bobby pin it in place and don't worry about it being unsightly, you can come back to it later. (7) Tighten the twist and finish the tail of the heart. Pin it in place along the side of the heart as well as at the point. (8) Repeat with the other section. (9) Go ahead and fix the bobby pins on so that they're to your liking and feel secure. It's okay if there's some bobby pin or elastic peeking out because this is a "messy" hairstyle. (10) When I finished my heart, there was no way I could hide the bobby pins holding the tails together so I took the front inch that I left out in the beginning and twisted it back and over the exposed pins. Push a bobby pin or two into the back of this twist and you're set!The Result:
 |
| 2.11.16 messy heart bun (x) |
The Verdict:
 |
| Messy Heart Bun after 5 hours (+rain) |
As per request, I'm including a photo of the hairstyle with the curls that didn't make it into the Instagram photo. Based on how haphazardly I stuck those bobby pins in, I was surprised how well the heart stayed in place. I'm very happy with my positioning. It helps that I'm not very tall so pretty much everybody could see the heart when I was going about my day. Although I would've had more hair to work with if I did the hairstyle in the back, there also would have been more bumps on the hair pulled back and the twists would've been harder to pin down. Another disadvantage of doing this in the back would be that if it started to fall to pieces, you would have no idea. I'm also glad I chose to curl my hair because even though I didn't want to use heat on my hair again so soon after I did Rey's Triple Buns, it hid the mistakes better and curls always make for a more romantic look. The Messy Heart Bun; signed, sealed, and delivered.
It's great that even with a small amount of hair, I could create such a big heart. A little goes a long way. I also loved how it's subtle but still visible. What do you think about this hairstyle? Will you be trying it? It might not be too late to recreate it for date night tonight or if you have plans! I really like it even though it was a pain to get to this point but it was worth the effort and tired arms. As always, don't forget to follow me on Instagram if you want to stay up-to-date on #hairoftheweek and tap the ... in the upper right hand corner to turn on notifications. The person with the most first likes every season gets an extra vote for Fan Favorite! May the odds be ever in your favor.
Talk to you soon!
Whenever you curl your hair I gain five more years of life
ReplyDeleteThat's funny because I feel like that's how much life my hair loses. Use (heat) protection, kids.
DeleteIt's like Pintertesting for hair. Also, those curls are stunning. Very princess-y.
ReplyDeleteIt is, isn't it? And thank you! I did feel rather princess-y that day.
Delete